Els's blog

Monday, November 27, 2006

Bitlocker Drive Encryption (without TPM)

Most of you have probably already heard about Bitlocker. But for those of you who don't know it, here's a short overview.

Bitlocker is a data protection feature available in Windows Vista and Longhorn Server. It is implemented to address the threats of data theft or exposure from lost or stolen PCs.

Bitlocker prevents a thief who boots another operating system or runs a software hacking tool from breaking Windows Vista file and system protections or performing offline viewing of the files stored on the protected drive.

Bitlocker enhances data protection by bringing together two major sub-functions: full drive encryption and the integrity checking of early boot components:

  • Drive encryption protects data by preventing unauthorized users from breaking Windows file and system protection on lost or stolen computers. This protection is achieved by encrypting the entire Windows volume. With Bitlocker all user and system files are encrypted including the swap and hibernation files.
  • Integrity checking the early boot components helps to ensure that data decryption is performed only if those components appear unmolested and that the encrypted drive is located in the original computer.

The feature ideally uses a Trusted Platform Module (TPM 1.2) to protect user data and to ensure that the PC has not been tampered with while the system was offline.
A TPM is a microchip designed to provide basic security-related functions, primarily involving encryption keys.

Now what if you do not have a TPM, but you would like to use Bitlocker Drive Encryption?
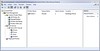
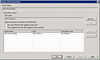
No problem, BDE is supported on machines without TPM. The only tricky part is that you cannot enable it using the GUI. In Control Panel (where you would normally enable Bitlocker), you'll see the following:

bitlocker01

So, how do you enable bitlocker then?
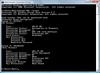
You will have to use manage-bde, a cscript tool that works with Bitlocker through the WMI interface.

This is what you do:

  • Open a Command Prompt as administrator! (Rightclick the cmd shortcut in the Start menu and choose "Run as administrator".)
  • cscript manage-bde.wsf -on C: -sk h: -rp -rk f:

 Command  Explanation 
 -on C:  Enable BDE on drive C:
 -sk h:  Create a startup key and save it on drive h:
 Drive h: will normally be a USB key 
 -rp  Create a recovery password 
 -rk f:  Create a recovery key and save it on drive f:
 Drive f: can be a USB key, hard drive, network drive

  • Save the numerical recovery password in a save place!
  • Insert your USB drive.
  • Restart your computer for a hardware test.
  • Use manage-bde -status to check whether the test was successful. If it was, encryption will begin. You can use the same command to keep track of the encryption progress.

bitlocker05

Friday, November 24, 2006

ADMX files

Using Administrative Templates in Group Policy you can change lots of the default Windows settings, like the Desktop, the Start Menu, Windows Explorer, ...
The settings that can be altered are described in .adm files. One of the benefits of these .adm files is that they can be adjusted. By modifying an .adm file, an administrator can manage almost every registry setting using a friendly interface and deploy these settings using Group Policy.

But there are a few disadvantages as well.

  1. .adm files are stored in individual GPOs.
    For organizations with lots of GPOs, this means that every policy has a copy of every .adm file used in the policy. And these policies, including the .adm files are replicated to all domain controllers in the environment. If you know that the .adm files take about 4 Mb of a policy's size, you can do your own math.
  2. .adm files are added in a specific language.
    This can be annoying in an environment where administrators speak different languages and would like to see the templates in their own language.

Vista and Longhorn Server introduce a new format for registry-based policy settings: ADMX files (in XML format) to address these issues.

ADMX files are divided into language-neutral and language-specific resources, available to all Group Policy administrators. These factors allow Group Policy tools to adjust their UI according to the administrator's configured language. Adding a new language to a set of policy definitions is achieved by ensuring that the language-specific resource file is available.

 File Type  File Location
 ADM  C:\inf
 ADMX language neutral  C:\policydefinitions 
 ADMX language specific

 C:\policydefinitions\en-us
 for the US English ADMX language 

One of the main benefits of using the new ADMX files is the central store. This option is available when you are managing domain-based GPOs, although the central store is not used by default.
In Vista and Longhorn the GPO Editor will no longer copy the adm files to each edited GPO, but will provide the ability to read from either a single domain-level location on the domain controller's Sysvol or from the local administrative workstation when the central store is unavailable.

  1. To create the central store:
    1. Create the root folder for the central store:
      C:\Sysvol\domain\policies\PolicyDefinitions on your DC
    2. Create a subfolder in the central store for each language your Group Policy administrators will use. Each subfolder is named after the appropriate ISO-style Language/Culture name. For example, to create a subfolder for US English:
      C:\Sysvol\domain\policies\PolicyDefinitions\en-us


  1. Populate the central store:
    1. Copy all the language-neutral ADMX files from your Vista workstation to the central store on your DC using the xcopy command:
      xcopy c:\PolicyDefinitions\*
      %logonserver%\sysvol\%userdnsdomain%\policies\PolicyDefinitions
    2. Copy all the ADMX language resource files from your Vista workstation to the central store on your DC:
      xcopy C:\PolicyDefinitions\en-us\*
      %logonserver%\sysvol\%userdnsdomain%\policies\PolicyDefinitions\en-us

Important factors:

  • New Vista or Longhorn-based policy settings can only be managed from Vista or Longhorn-based computers. These policies are defined only in ADMX files and, as such, are not exposed on the Windows Server 2003, XP or 2000 versions of the group policy management tools.
  • The Vista and Longhorn version of the GPMC can be used to manage all OS systems that support Group Policy.
  • In the majority of situations, you will not notice the presence of ADMX files during your day-to-day Group Policy administration tasks.

Thursday, November 23, 2006

Print Management in Windows Vista

Print Management is an MMC snap-in that enables you to install, view and manage all of the printers in your organization from any computer running Windows Vista or Windows Server 2003 R2.

You can use Print Management to install printer connections to a group of client computers simultaneously. It can help you find printers that have an error condition by using filters. It allows you to send e-mail notifications or run scripts when a printer or print server needs attention. On printer models that provide a web page, Print Management has access to more data, such as toner and paper levels, which you can manage from remote locations.

 Print Mgmt

But one of the best features of Print Management is that you can use it to deploy printers to users or computers using Group Policy.

To do this, you use the Deploy with Group Policy dialog box to automatically add a printer connection to an existing GPO. You simply right click the printer you wish to deploy and select deploy with Group Policy. When group policy processing runs on client computers, the printer connection settings are applied to the users or computers associated with the GPO.

To enable this feature on computers running versions of Windows earlier than Windows Vista, you must use a utility called PushPrinterConnections.exe.
Add this utility to a startup script or a logon script for all computers or users that will get the GPO with the printer settings.
Use the same policy for the script and the printer connection settings.
You can find the PushPrinterConnections.exe in the following directory: %Systemdrive%\Windows\PmcSnap on a Windows Server 2003 R2 machine.

 Print Mgmt GPO

Remarks:

  1. On computers running Windows 2000 only per-user printer connections are supported. For computer policies, you need at least Windows XP.
  2. Before you can use Group Policy to deploy printers this way, your Active Directory environment has to support these features. That means that you will have to update your AD Schema to match the R2 version using the following command: adprep.exe /forestprep.
    (Adprep can be found on the R2 CD in the following directory: Cmpnents\r2\adprep.)